KappaLayout
KappaLayout
I've been working with Java for a long time now, and keep running into the same problem -- lack of a decent layout manager. I've tried the various IDE's, but found them incapable of producing an efficient and maintainable interface. For the most part, they are limited to the same old AWT layout managers and tend to produce inefficient and hard to follow code. Others use a proprietary language or file format to create the layout, which is difficult or impossible to maintain without using proprietary tools.
I've searched the internet for a decent layout manager, but haven't found one that is as flexible or powerful as GridBag. I have used GridBag a lot, I have yet to find a layout that GridBag is unable to handle. What I don't like about GridBag is that it is cumbersome to use.
I did find a TableLayout manager from Westhawk (www.westhawk.co.uk) that I liked and used a lot with Java 1.1.x, but for some reason it didn't work correctly with Java 2. Westhawk's TableLayout uses a simple constraint string that makes it real easy to create complex layouts. I was really disappointed to find that it had problems with Java 2. I started to look into the source code, and found it is very C-like and clearly shows its C origins. I thought, "Make your own!"
So I wrote the KappaLayout -- similar to the others, but this one's simpler, easier to use, flexible and as powerful as GridBag. I used several layouts for inspiration, notably GridBag and TableLayout, but also BoxLayout and Grid. I like the constraint string of TableLayout, but also like the flexibility and power of GridBagConstraints. I like the strut concept from Box, and the ability to make components (particularly buttons) the same size that Grid provides. KappaLayout incorporates all of these and improves and simplifies. KappaLayout's constraint string is more flexible than TableLayout, KappaLayout.Constraints is simpler and easier to use than GridBagConstraints.
Here's a real simple example:
This will put a button on a panel in the top of its cell, stretched to
fill the cell width, with a 3 pixel pad:
Panel p = new Panel(new KappaLayout());
Button b = new Button("OK");
p.add(b, "0, 0, 1, 2, 2, w, 3");
The Constraints String
The constraints string has this format:"x, y, w, h, a, s, p"
defined as follows:
- 'x' is the column to put the component. The left-most column is column 0, and
is the default.
- 'y' is the row to put the component. The top-most row is row 0, and is
the default.
- 'w' is the width of the component in columns (column span), default is 1
- 'h' is the height of the component in rows (row span), default is 1
- 'a' is the alignment within the cell. This parameter handles both horizontal
and vertical alignment at once. 'a' can be a value between 0 and 8,
inclusive, (default is 0) and causes the alignment of the component within the cell to follow
this pattern:
8 1 2
7 0 3
6 5 4
or
0 center
1 top center
2 top right
3 right
4 bottom right
5 bottom center
6 bottom left
7 left
8 top left
Alternatively, compass directions can be used:
N = North
NE = NorthEast
E = East
SE = SouthEast
S = South
SW = SouthWest
W = West
NW = NorthWest
- 's' is the stretch value. 's' can have these values:
'w' stretch component to fill cell width
'h' stretch component to fill cell height
'wh' or 'hw' stretch component to fill both cell width and cell height
'0' (character 'zero') no stretch (default)
This parameter is case insensitive, so "Wh" is equivalent to "wh".
- 'p' is the amount of padding to put around the component. This much blank space will be applied on all sides of the component, default is 0. If Swing is available, this isn't necessary due the variety of borders that can be used with Swing components, but I included it for AWT-only interfaces, which still prevail in the browser/applet arena.
p.add(new Button("OK"), ",4,,,w,");
which means put the button at column 0, row 4, default 1 column wide, default
1 row tall, stretch to fit width of column, no padding. White space in the parameter string is ignored, so these are identical:
p.add(new Button("OK"), ",4,,,w,");
p.add(new Button("OK"), " 0, 4, , , w");
Here's an example of the minimal constraint string: p.add(new Button("OK"), "");
which defaults to "0,0,1,1,0,0,0".
The Constraints Object
Rather than use a constraints string, a KappaLayout.Constraints object may be used directly, similar to how GridBag uses a GridBagConstraints. For example,
Panel p = new Panel(new KappaLayout());
KappaLayout.Constraints con = KappaLayout.createConstraint();
con.x = 1;
con.y = 2;
con.w = 2;
con.h = 2;
con.s = "wh";
panel.add(new Button("OK"), con);
con.x += 3;
panel.add(new Button("Cancel"), con);
For the alignment parameter, use the numbers as described above. To use the
alternate compass directions, use one of:KappaLayout.N
KappaLayout.NE
KappaLayout.E
KappaLayout.SE
KappaLayout.S
KappaLayout.SW
KappaLayout.W
KappaLayout.NW
The center of the cell is always 0.
Note that the same Constraints can be reused, thereby reducing the number of objects created.
Boxes and Struts
KappaLayout also provides struts, similar to Box. Struts are invisible components that are useful for providing blank space between visible components or for setting a minimum size on a column or row. Horizontal struts are created by calling
KappaLayout.createHorizontalStrut(int width)
and have width but no height. Vertical struts are created by calling
KappaLayout.createVerticalStrut(int height)
and have height but no width. Calling the method
KappaLayout.createStrut(int width, int height)
creates a rectangular strut or box.
Struts as used above set a minimum size on a column or row. The column or row may be wider or taller if larger components are added in the same column or row. Struts can also be rigid, which means that they effectively lock the width or height of the column or row:
using
KappaLayout.createHorizontalStrut(int width, boolean rigid)
like this:
p.add(KappaLayout.createHorizontalStrut(10, true), "0, 0")
sets the first column to exactly 10 pixels wide.
Convenience Methods
KappaLayout has several other methods that can be of help in laying out components.Columns and rows can be set to a specific width or height, respectively, by calling
setColumnWidth(int column, int width)
or
setRowHeight(int row, int height)
These methods are useful for setting a maximum size on a column or row or setting equal width columns or rows. Note that empty columns or rows will have 0 size regardless of setting to a specific size, so put a strut in the column or row to make a blank column or row actually have some size. Use these methods with care since the component will be truncated if the component in the column or row is larger than the set width or height.
KappaLayout has better methods of making two or more columns or rows the same size:
makeColumnsSameWidth(int column1, int column2)
makeColumnsSameWidth(int[] columns)
makeRowsSameHeight(int row1, int row2)
makeRowsSameHeight(int[] rows)
These methods do just what their names imply. The actual column width or row height is determined by taking the widest or tallest and making the other columns or rows the same. These methods will not truncate a component in either direction.
Examples
Following are several complete examples. These examples use bothContainer.add(String, Component) and
Container.add(Component, Object). JDK documentation recommends the
later, although the former tends to line up the constraints strings making them
easier to manage. As far as KappaLayout is concerned, either is acceptable. Of
course, the add(Component, Object) method must be use when using
KappaLayout.Components directly.
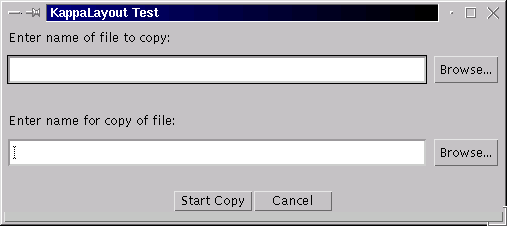
The first three examples make the same dialog, but in different ways.
Example 1
import java.awt.*;
import java.awt.event.*;
import java.util.*;
import javax.swing.*;

public class KappaLayoutTest {

   public KappaLayoutTest() {
      // set up a Frame
      Frame f = new Frame("KappaLayout Test");
      f.addWindowListener(new WindowAdapter() {
                             public void windowClosing(WindowEvent we) {
                                f.dispose();
                             }
                          });
      f.setLayout(new KappaLayout());

      // standard use of KappaLayout
      Panel p1 = new Panel(new KappaLayout());
      p1.add("0,0,1,1,7,,3", new Label("Enter name of file to copy:"));
      p1.add("0,1,1,1,,,3", new TextField(50));
      p1.add("1,1,1,1,,hw,3", new Button("Browse..."));

      // use KappaLayout.Constraints, this makes a panel identical to panel p1
      Panel p2 = new Panel(new KappaLayout());
      KappaLayout.Constraints con = KappaLayout.createConstraint();
      con.x = 0;
      con.y = 0;
      con.w = 1;
      con.h = 1;
      con.a = 7;
      con.p = 3;
      p2.add(new Label("Enter name for copy of file:"), con);
      con.y += 1;
      con.a = 0;
      p2.add(new TextField(50), con);
      con.x += 1;
      con.s = "wh";
      p2.add(new Button("Browse..."), con);

      // make a button panel -- make the buttons the same width by
      // stretching to fill cells horizontally and setting the columns to the
      // same width
      KappaLayout kl3 = new KappaLayout();
      Panel p3 = new Panel(kl3);
      p3.add("0,1,1,1,,w", new Button("Start Copy"));
      p3.add("1,1,1,1,,w", new Button("Cancel"));
      kl3.makeColumnsSameWidth(0, 1);

      // lay out the frame, using a couple of vertical struts to unclutter the parts
      f.add("0,0,1,1", p1);
      f.add("0,1,1,1", KappaLayout.createVerticalStrut(20));
      f.add("0,2,1,1", p2);
      f.add("0,3,1,1", KappaLayout.createVerticalStrut(20));
      f.add("0,4,1,1", p3);
      f.pack();
      f.show();
   }

   public static void main(String[] args) {
      KappaLayoutTest tlt = new KappaLayoutTest();
   }
}
Example 2
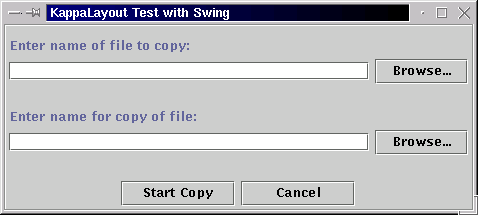
Here is the same example using Swing components. Note the minor tweaking to get a similar appearance as Swing uses bold font rather than plain font.
import java.awt.*;
import java.awt.event.*;
import java.util.*;
import javax.swing.*;
import javax.swing.border.*;

public class KappaLayoutTestSwing {

   public KappaLayoutTestSwing() {
      // set up a Frame
      JFrame f = new JFrame("KappaLayout Test with Swing");
      f.addWindowListener(new WindowAdapter() {
                             public void windowClosing(WindowEvent we) {
                                f.dispose();
                             }
                          });
      JPanel contents = new JPanel(new KappaLayout());
      f.setContentPane(contents);

      // standard use of KappaLayout
      JPanel p1 = new JPanel(new KappaLayout());
      p1.add("0,0,1,1,7,,3", new JLabel("Enter name of file to copy:"));
      p1.add("0,1,1,1,,,3", new JTextField(30));
      p1.add("1,1,1,1,,hw,3", new JButton("Browse..."));

      // use KappaLayout.Constraints, this makes a panel identical to panel p1
      JPanel p2 = new JPanel(new KappaLayout());
      KappaLayout.Constraints con = KappaLayout.createConstraint();
      con.x = 0;
      con.y = 0;
      con.w = 1;
      con.h = 1;
      con.a = 7;
      con.p = 3;
      p2.add(new JLabel("Enter name for copy of file:"), con);
      con.y += 1;
      con.a = 0;
      p2.add(new JTextField(30), con);
      con.x += 1;
      con.s = "wh";
      p2.add(new JButton("Browse..."), con);

      KappaLayout kl3 = new KappaLayout();
      JPanel p3 = new JPanel(kl3);
      p3.add("0,1,1,1,,w, 3", new JButton("Start Copy"));
      p3.add("1,1,1,1,,w, 3", new JButton("Cancel"));
      kl3.makeColumnsSameWidth(0,1);

      // lay out the frame, using a couple of vertical struts to unclutter the parts
      contents.setBorder(new EtchedBorder());
      contents.add("0,0,1,1", KappaLayout.createVerticalStrut(10));
      contents.add("0,1,1,1", p1);
      contents.add("0,2,1,1", KappaLayout.createVerticalStrut(20));
      contents.add("0,3,1,1", p2);
      contents.add("0,4,1,1", KappaLayout.createVerticalStrut(20));
      contents.add("0,5,1,1", p3);
      f.pack();
      f.show();
   }

   public static void main(String[] args) {
      KappaLayoutTestSwing tlts = new KappaLayoutTestSwing();
   }
}
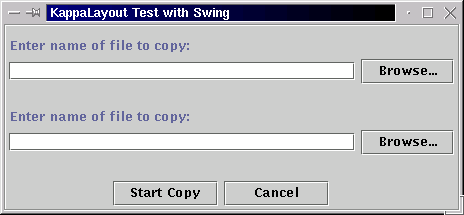
Example 3Same example, but using KappaLayout straight up, without subpanels. This produces the same layout as above. This shows KappaLayout at it's best: simple, quick, and powerful.
import java.awt.*;
import java.awt.event.*;
import java.util.*;
import javax.swing.*;
import javax.swing.border.*;

public class KappaLayoutTestSwing2 {

   public KappaLayoutTestSwing2() {
      // set up a Frame
      JFrame f = new JFrame("KappaLayout Test with Swing");
      f.addWindowListener(new WindowAdapter() {
                             public void windowClosing(WindowEvent we) {
                                f.dispose();
                             }
                          });
      KappaLayout kl = new KappaLayout();
      JPanel contents = new JPanel(kl);
      f.setContentPane(contents);

      // layout:
      // LLLLLLLL   1 label, 8 columns wide
      // TTTTTTTB   1 textfield, 7 columns wide, 1 button
      // S          a strut to unclutter the parts
      // LLLLLLLL   1 label, 8 columns wide
      // TTTTTTTB   1 textfield, 7 columns wide, 1 button
      // S          a strut to unclutter the parts
      //    BB      2 buttons

      contents.setBorder(new EtchedBorder());
      contents.add("", KappaLayout.createVerticalStrut(10));
      contents.add("0,1,8,1,7, ,3", new JLabel("Enter name of file to copy:"));
      contents.add("0,2,7,1,7,w,3", new JTextField(15));
      contents.add("7,2,1,1,7,w,3", new JButton("Browse..."));
      contents.add("0,3,1,1", KappaLayout.createVerticalStrut(20));
      contents.add("0,4,8,1,7,,3", new JLabel("Enter name of file to copy:"));
      contents.add("0,5,7,1,7,w,3", new JTextField(15));
      contents.add("7,5,1,1,7,hw,3", new JButton("Browse..."));
      contents.add("0,6,1,1", KappaLayout.createVerticalStrut(20));
      contents.add("4,7,1,1,,w, 3", new JButton("Start Copy"));
      contents.add("5,7,1,1,,w, 3", new JButton("Cancel"));
      kl.makeColumnsSameWidth(4,5);

      f.pack();
      f.show();
   }

   public static void main(String[] args) {
      KappaLayoutTestSwing2 tlts = new KappaLayoutTestSwing2();
   }
}
Example 4Here's an example that is difficult to make look good, even with GridBag. In particular, getting the buttons between the lists centered vertically is difficult, centering the buttons on the bottom is hard, and keeping the lists the same width is a hassle. KappaLayout makes this easy. Here's what it looks like:
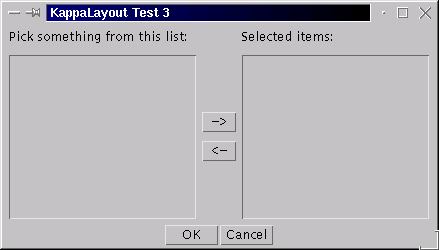
And here's the code:
import java.awt.*;
import java.awt.event.*;
import java.util.*;
import javax.swing.*;

public class KappaLayoutTest3 {

   public KappaLayoutTest3() {
      // set up a Frame
      Frame f = new Frame("KappaLayout Test 3");
      f.addWindowListener(new WindowAdapter() {
                             public void windowClosing(WindowEvent we) {
                                f.dispose();
                             }
                          });
      KappaLayout kl = new KappaLayout();
      f.setLayout(kl);

      /*
      Design:
       012
      0L L     L = Labels
      1C C     C = List, span 6 rows
      2C C
      3CBC     B = Button, ->
      4CBC     B = Button, <-
      5C C
      6C C
      7PPP     P = Panel w/Buttons, span 3 columns
      */
      f.add("0,0,,1,7,w,2", new Label("Pick something from this list:"));
      f.add("2,0,,1,7,w,2", new Label("Selected items:"));
      f.add("0,1,,6,,wh,5", new List(10));
      f.add("2,1,,6,,wh,5", new List(10));
      f.add("1,3,,,,w", new Button("->"));
      f.add("1,4,,,,w", new Button("<-"));
      kl.makeColumnsSameWidth(0,2);

      KappaLayout kl2 = new KappaLayout();
      Panel button_panel = new Panel(kl2);
      button_panel.add("0,1,1,,,w", new Button("OK"));
      button_panel.add("1,1,1,,,w", new Button("Cancel"));
      kl2.makeColumnsSameWidth(0,1);
      f.add("0,7,3,1", button_panel);

      f.pack();
      f.show();
   }

   public static void main(String[] args) {
      new KappaLayoutTest3();
   }
}
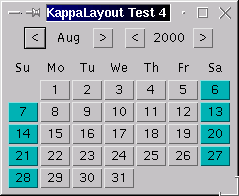
Example 5Here's one last example that shows the power of KappaLayout.Constraints.
import java.awt.*;
import java.awt.event.*;
import java.util.*;

public class KappaLayoutTest4 {

   public KappaLayoutTest4() {
      // set up a Frame
      Frame f = new Frame("KappaLayout Test 4");
      f.addWindowListener(new WindowAdapter() {
                             public void windowClosing(WindowEvent we) {
                                f.dispose();
                             }
                          });
      KappaLayout kl = new KappaLayout();
      f.setLayout(kl);

      // make a calendar like Sean's
      KappaLayout kl1 = new KappaLayout();
      Panel p1 = new Panel(kl1);
      p1.add(new Button("<"),   "0,0,1,1");
      p1.add(new Label("Aug", Label.CENTER),  "1,0,1,1,0,w");
      p1.add(new Button(">"),   "2,0,1,1");
      p1.add(KappaLayout.createHorizontalStrut(10), "3,0");
      p1.add(new Button("<"),   "4,0,1,1");
      p1.add(new Label("2000", Label.CENTER), "5,0,1,1,0,w");
      p1.add(new Button(">"),   "6,0,1,1");
      kl1.makeColumnsSameWidth(new int[]{0,2,4,6});
      kl1.makeColumnsSameWidth(1,5);

      KappaLayout kl2 = new KappaLayout();
      Panel p2 = new Panel(kl2);
      p2.add(new Label("Su", Label.CENTER), "0,0");
      p2.add(new Label("Mo", Label.CENTER), "1,0");
      p2.add(new Label("Tu", Label.CENTER), "2,0");
      p2.add(new Label("We", Label.CENTER), "3,0");
      p2.add(new Label("Th", Label.CENTER), "4,0");
      p2.add(new Label("Fr", Label.CENTER), "5,0");
      p2.add(new Label("Sa", Label.CENTER), "6,0");
      KappaLayout.Constraints q = KappaLayout.createConstraint();
      q.s = "w";
      for ( int i = 0; i < 6; i++ ) {
         for ( int j = 0;  j < 7; j++ ) {
            q.x = j;
            q.y = i + 1;
            if ( i * 7 + j > 0 && i * 7 + j <= 31 ){
               Button b = new Button(String.valueOf(i * 7 + j));
               if ((i * 7 + j) % 7 == 0 || (i * 7 + j) % 7 == 6)
                  b.setBackground(Color.cyan.darker());
               p2.add(b, q);
            }
         }
      }
      kl2.makeColumnsSameWidth(new int[]{0,1,2,3,4,5,6});

      f.add(p1, "0,0,,,,,3");
      f.add(KappaLayout.createVerticalStrut(2), "0,1");
      f.add(p2, "0,2,,,,,3");

      f.pack();
      f.show();
   }

   public static void main(String[] args) {
      new KappaLayoutTest4();
   }
}